
Skip to manual content

DAW QUICKSTART

Quickstart

Installation & Setup

If you are new to setting up MIDI plugins, quick DAW setup guides are available in the “Quickstart” folder inside your download.

QUICKSTART GUIDE

01 / 04

Ableton Live application icon

Ableton Live Setup

Mac

Create two MIDI tracks, then follow the steps below for live keyboard input.

Ableton Live Session mixer detail with two MIDI tracks. The left track is 'Chord Chameleon' with Monitor on Auto and a red, armed Arm button. The right track is 'VST INSTRUMENT' with MIDI From set to Chord Chameleon on both menus, Monitor set to In and an unarmed grey Arm button. Teal outlines highlight the title bar, the MIDI From menus, the In button and both Arm buttons. Numbered markers 1, 2, 3, 4 and 5 match the steps with those numbers.

1

2

3

4

5

Left half of the Ableton Live mixer: the 'Chord Chameleon' MIDI track, with a white title bar, MIDI From All Ins, Monitor on Auto, MIDI To No Output and a red, armed Arm button. Teal outlines highlight the title bar and the Arm button. Numbered markers 1 and 4 match the steps with those numbers.

1

4

Left half of the Ableton Live mixer: the 'Chord Chameleon' MIDI track, with a white title bar, MIDI From All Ins, Monitor on Auto, MIDI To No Output and a red, armed Arm button. Teal outlines highlight the title bar and the Arm button. Numbered markers 1 and 4 match the steps with those numbers.

1

4

Right half of the Ableton Live mixer: the 'VST INSTRUMENT' track, with MIDI From set to Chord Chameleon on both menus, Monitor set to In, Audio To Main, a level meter and a grey, unarmed Arm button. Teal outlines highlight the MIDI From menus, the In button and the Arm button. Numbered markers 2, 3 and 5 match the steps with those numbers.

2

3

5

Right half of the Ableton Live mixer: the 'VST INSTRUMENT' track, with MIDI From set to Chord Chameleon on both menus, Monitor set to In, Audio To Main, a level meter and a grey, unarmed Arm button. Teal outlines highlight the MIDI From menus, the In button and the Arm button. Numbered markers 2, 3 and 5 match the steps with those numbers.

2

3

5

1

Add Chord Chameleon to the first MIDI track

2

Add your instrument to the second MIDI track, then choose Chord Chameleon in both “MIDI From” menus

3

On the instrument track, set Monitor to ‘In’

4

Arm Chord Chameleon’s track

5

Leave the instrument track unarmed for live play, or arm it to record the processed MIDI

Alternate Live Input Setup

Alternatively, follow steps 1–3, then leave Chord Chameleon’s track unarmed and set its Monitor to ‘In’. This lets you record your live playing as processed MIDI by arming only the instrument track. If you switch between multiple instruments in the same set, the main setup shown above can make it easier to keep MIDI routed to the instrument you want to play.

QUICKSTART GUIDE

02 / 04

Ableton Live application icon

Ableton Live Setup

WINDOWS

Create two MIDI tracks, then follow the steps below for live keyboard input.

Ableton Live Browser on Windows with Plug-ins selected in the sidebar. The Chord Chameleon VST3 entry is right-clicked, and its context menu shows 'Auto-Scale Plugin Window' outlined in teal, above Clear All Colors, Favorites and Orange. Numbered marker 1 matches step 1.

1

Close-up of Ableton Live's Browser: the selected Chord Chameleon VST3 row and its right-click menu with 'Auto-Scale Plugin Window' outlined in teal, then Clear All Colors, Favorites and Orange. Numbered marker 1 matches step 1.

1

Close-up of Ableton Live's Browser: the selected Chord Chameleon VST3 row and its right-click menu with 'Auto-Scale Plugin Window' outlined in teal, then Clear All Colors, Favorites and Orange. Numbered marker 1 matches step 1.

1

1

WINDOWS · BEFORE LOADING CHORD CHAMELEON

Right-click Chord Chameleon in Ableton’s Browser and make sure Auto-Scale Plugin Window is OFF

An Ableton/Windows plug-in scaling setting, not a Chord Chameleon control.

Ableton Live mixer with two MIDI tracks. Track 1, titled Chord Chameleon, is armed with a red record button. Track 2, VST INSTRUMENT, has MIDI From set to Chord Chameleon in both menus and Monitor set to In. Teal outlines mark the title bar, the MIDI From group, the In button and both arm buttons. Numbered markers 2, 3, 4, 5 and 6 match the steps with those numbers.

2

3

4

5

6

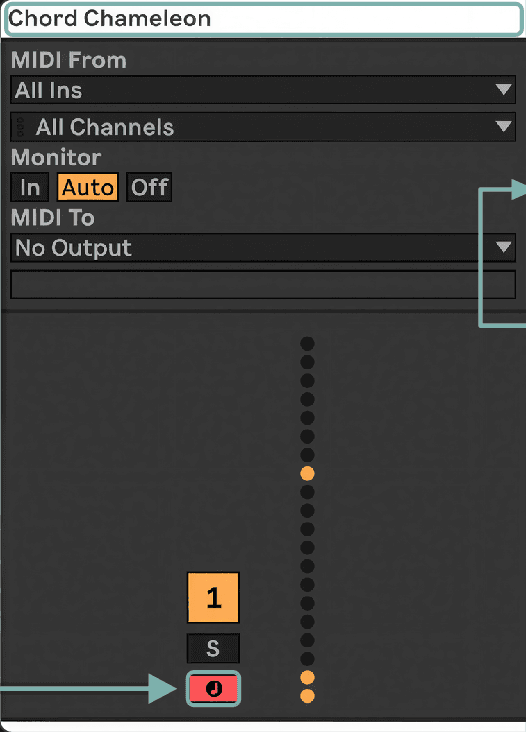
Ableton Live mixer, track 1 'Chord Chameleon'. The track title bar is outlined in teal. Below it: MIDI From All Ins and All Channels, Monitor on Auto, MIDI To No Output, and the record-arm button armed in red, also outlined in teal. Numbered markers 2 and 5 match the steps with those numbers.

2

5

Ableton Live mixer, track 1 'Chord Chameleon'. The track title bar is outlined in teal. Below it: MIDI From All Ins and All Channels, Monitor on Auto, MIDI To No Output, and the record-arm button armed in red, also outlined in teal. Numbered markers 2 and 5 match the steps with those numbers.

2

5

Ableton Live mixer, track 2 'VST INSTRUMENT': MIDI From set to Chord Chameleon twice, Monitor In active in cyan, Audio To Main, and an unarmed grey record button. Teal outlines mark MIDI From, In and the arm button. Numbered markers 3, 4 and 6 match the steps with those numbers.

3

4

6

Ableton Live mixer, track 2 'VST INSTRUMENT': MIDI From set to Chord Chameleon twice, Monitor In active in cyan, Audio To Main, and an unarmed grey record button. Teal outlines mark MIDI From, In and the arm button. Numbered markers 3, 4 and 6 match the steps with those numbers.

3

4

6

2

Add Chord Chameleon to the first MIDI track

3

Add your instrument to the second MIDI track, then choose Chord Chameleon in both “MIDI From” menus

4

On the instrument track, set Monitor to ‘In’

5

Arm Chord Chameleon’s track

6

Leave the instrument track unarmed for live play, or arm it to record the processed MIDI

Alternate Live Input Setup

Alternatively, follow steps 1–4, then leave Chord Chameleon’s track unarmed and set its Monitor to ‘In’. This lets you record your live playing as processed MIDI by arming only the instrument track. If you switch between multiple instruments in the same set, the main setup shown above can make it easier to keep MIDI routed to the instrument you want to play.

QUICKSTART GUIDE

03 / 04
Logic Pro application icon

Logic Pro Setup

For Live Keyboard Input
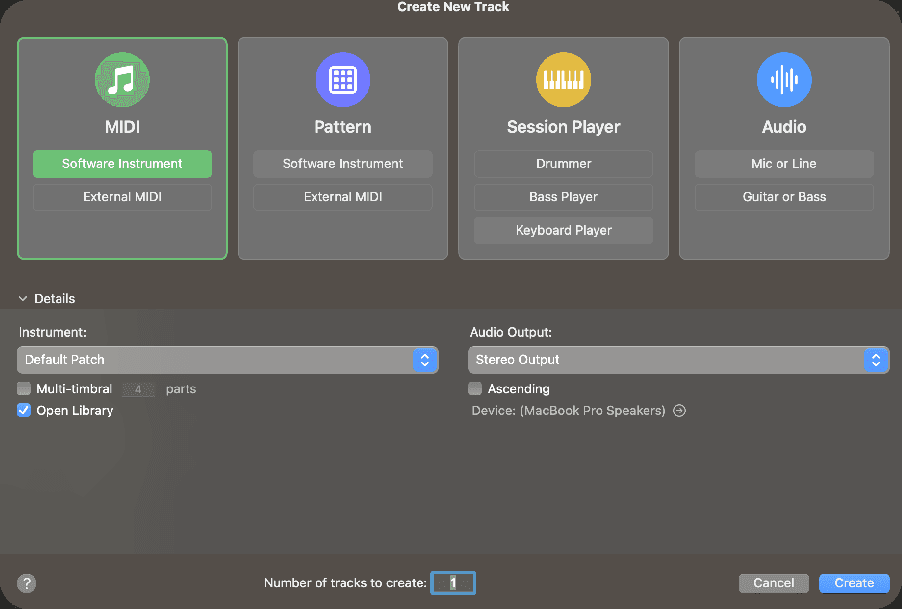
Logic Pro Create New Track dialog with the MIDI card selected and Software Instrument highlighted in green. Numbered marker 1 matches step 1.

1

Detail of the Logic Pro Create New Track dialog: the MIDI card with Software Instrument highlighted in green, next to the Pattern card. Numbered marker 1 matches step 1.

1

Detail of the Logic Pro Create New Track dialog: the MIDI card with Software Instrument highlighted in green, next to the Pattern card. Numbered marker 1 matches step 1.

1

1

TRACK › NEW TRACK

Create a Software Instrument track

Live play: Use this setup for live play and automation recording

Logic Pro channel strips; the MIDI FX slot sits above the E-Piano instrument slot. Numbered marker 2 matches step 2.

2

2

CHANNEL STRIP

Click the MIDI FX slot

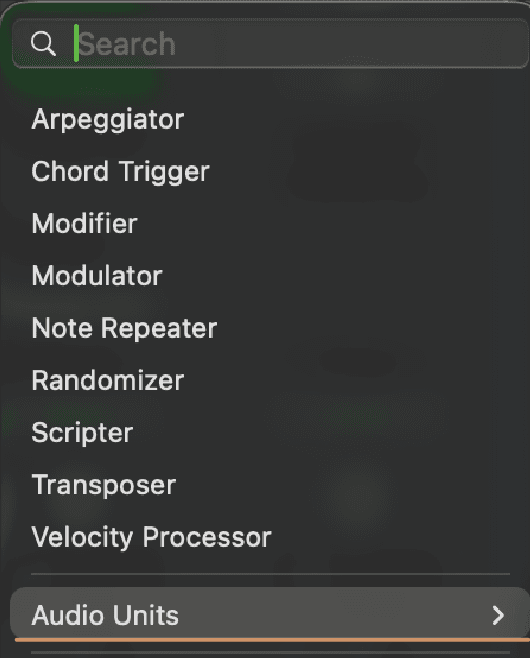
Logic Pro MIDI FX menu: Search, or Audio Units › Chord Chameleon Music › Chord Chameleon. Numbered marker 3 matches step 3.

3

Logic Pro MIDI FX menu with the Search field at the top and Audio Units at the bottom. Numbered marker 3 matches step 3.

3

Logic Pro MIDI FX menu with the Search field at the top and Audio Units at the bottom. Numbered marker 3 matches step 3.

3

Logic Pro submenu item “Chord Chameleon Music” with its submenu arrow.
Logic Pro submenu with “Chord Chameleon” selected in blue.

3

MIDI FX MENU

Search for Chord Chameleon, then press Return

Or navigate to ‘Audio Units’ and insert Chord Chameleon

OPTIONAL

Recording Processed MIDI

TWO-TRACK WORKFLOW

Logic Pro Track Inspector for the second track with Internal MIDI In set to 1 Inst In (ringed in teal), beside the track headers where the second track, Deluxe Classic, is muted and record-enabled (ringed in orange). Numbered markers 2 and 3 match the steps with those numbers.

2

3

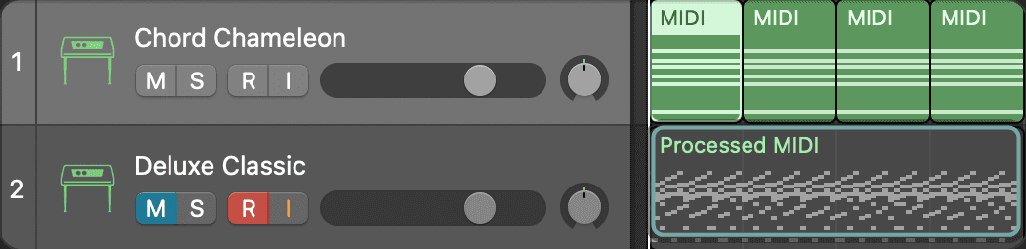
Logic Pro tracks after recording: the first track, Chord Chameleon, holds four MIDI regions, and the second track, Deluxe Classic, holds the recorded Processed MIDI region, ringed in teal. Numbered marker 4 matches step 4.

4

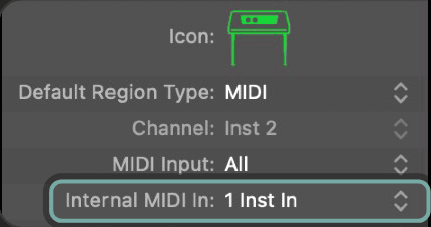
Logic Pro Track Inspector with Internal MIDI In set to 1 Inst In, ringed in teal. Numbered marker 2 matches step 2.

2

Logic Pro Track Inspector with Internal MIDI In set to 1 Inst In, ringed in teal. Numbered marker 2 matches step 2.

2

Logic Pro track headers; the second track is muted and record-enabled, ringed in orange. Numbered marker 3 matches step 3.

3

Logic Pro track headers; the second track is muted and record-enabled, ringed in orange. Numbered marker 3 matches step 3.

3

Logic Pro: the recorded Processed MIDI region on the second track, ringed in teal, below the first track's MIDI regions. Numbered marker 4 matches step 4.

4

Logic Pro: the recorded Processed MIDI region on the second track, ringed in teal, below the first track's MIDI regions. Numbered marker 4 matches step 4.

4

1

Create two Software Instrument tracks. Add Chord Chameleon to the first track.

2

Unfold the second track’s ‘Track’ Inspector and set its Internal MIDI In to the first track.

3

Record-enable and mute the second track.

4

Chord Chameleon’s note transformations will print to the second track when recording. This method is ideal for remixing existing MIDI files.

QUICKSTART GUIDE

04 / 04

FL Studio application icon

FL Studio Setup

For live keyboard input with VST instruments
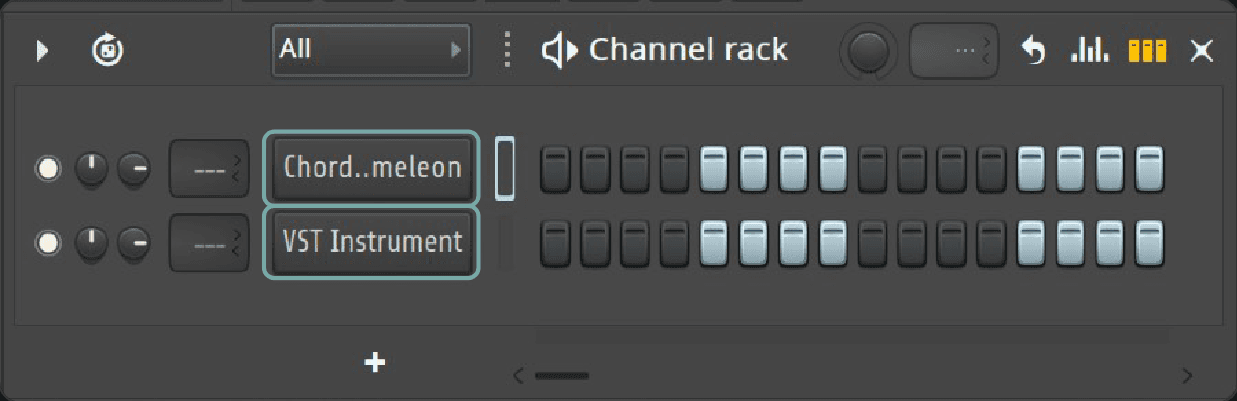
FL Studio Channel rack with two channels. The Chord Chameleon (label truncated in the screenshot) and VST Instrument channel buttons are outlined in teal. Numbered marker 1 matches step 1.

1

Left part of the FL Studio Channel rack: the Chord Chameleon (label truncated in the screenshot) and VST Instrument channel buttons, both outlined in teal. Numbered marker 1 matches step 1.

1

Left part of the FL Studio Channel rack: the Chord Chameleon (label truncated in the screenshot) and VST Instrument channel buttons, both outlined in teal. Numbered marker 1 matches step 1.

1

1

Add Chord Chameleon and your VST instrument to separate channels in the Channel Rack.

FL Studio MIDI settings for Chord Chameleon: Input port, Output port set to 1 and outlined in teal, and Event bus set to MIDI Input. Numbered marker 2 matches step 2.

2

MUST MATCH

FL Studio MIDI settings for the VST instrument: Input port set to 1 and outlined in teal, and an empty Output port. Numbered marker 3 matches step 3.

3

2

CHORD CHAMELEON · PLUG-IN OPTIONS

Open Chord Chameleon and click this plugin options icon:

FL Studio plug-in options icon: a plug with a small gear

Then, set Chord Chameleon’s Output port to 1 or any unused port.

3

VST INSTRUMENT · PLUG-IN OPTIONS

Open your VST Instrument and click this plugin options icon:

FL Studio plug-in options icon: a plug with a small gear

Then, set your VST Instrument’s Input port to the same port as Chord Chameleon’s Output port.

FL Studio plug-in wrapper header 'Chord Chameleon (Master)' with its toolbar icons. The plug-and-gear icon is outlined in teal, and the ON, PAN, VOL, PITCH, RANGE and TRACK controls are at the right. Numbered marker 4 matches step 4.

4

Left part of the FL Studio plug-in wrapper header 'Chord Chameleon (Master)' with three toolbar icons. The plug-and-gear icon is outlined in teal. Numbered marker 4 matches step 4.

4

Left part of the FL Studio plug-in wrapper header 'Chord Chameleon (Master)' with three toolbar icons. The plug-and-gear icon is outlined in teal. Numbered marker 4 matches step 4.

4

4

Return to Chord Chameleon and click this icon:

Done: It will now process your live MIDI input and send it to your VST instrument.

OPTIONAL

Recording Processed MIDI

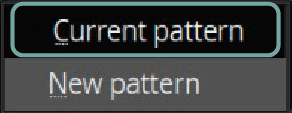
FL Studio right-click menu with 'Burn MIDI to' highlighted and its submenu open. 'Current pattern' is outlined in teal, with 'New pattern' below it. Numbered marker 3 matches step 3.

3

FL Studio right-click menu row “Burn MIDI to” with its submenu arrow. Numbered marker 3 matches step 3.

3

FL Studio right-click menu row “Burn MIDI to” with its submenu arrow. Numbered marker 3 matches step 3.

3

FL Studio submenu with “Current pattern” outlined in teal above “New pattern”.

1

Record your performance into the piano roll on Chord Chameleon’s channel.

2

Right-click Chord Chameleon.

3

Choose Burn MIDI to > Current pattern.

4

Chord Chameleon’s note transformations will print to the piano roll.

FL Studio Setup (FL Instruments)

For live keyboard input with native FL Studio instruments

FL Studio Channel rack with Sampler and Patcher channels. The Patcher button is selected (maroon) and outlined in teal. Numbered marker 1 matches step 1.

1

FL Studio Channel rack detail: the Sampler channel and the selected Patcher channel, outlined in teal. Numbered marker 1 matches step 1.

1

FL Studio Channel rack detail: the Sampler channel and the selected Patcher channel, outlined in teal. Numbered marker 1 matches step 1.

1

1

Add Patcher to the Channel Rack, then open it.

PATCHER · MAP TAB

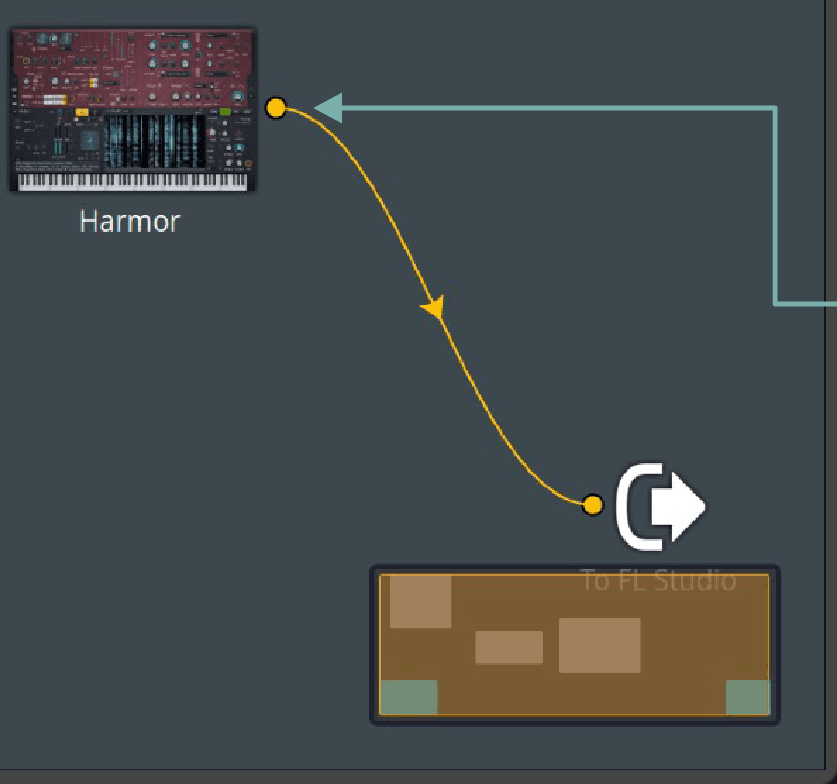
FL Studio Patcher (Master), Map tab. From FL Studio connects by a green cable to the Chord Chameleon puzzle node, which connects by a green cable to Harmor. A yellow cable runs from Harmor to To FL Studio. Teal leader lines point to the node, its label, the green cable and Harmor's output. Numbered markers 2, 3, 4 and 5 match the steps with those numbers.

2

3

4

5

Left part of the FL Studio Patcher map: From FL Studio connects by a green cable to the Chord Chameleon puzzle node. Teal leader lines point to the node, the cable and the node label. Numbered markers 2, 3 and 5 match the steps with those numbers.

2

3

5

Left part of the FL Studio Patcher map: From FL Studio connects by a green cable to the Chord Chameleon puzzle node. Teal leader lines point to the node, the cable and the node label. Numbered markers 2, 3 and 5 match the steps with those numbers.

2

3

5

Right part of the FL Studio Patcher map: Harmor with a yellow cable from its output to To FL Studio. A teal leader line points to Harmor's output port. Numbered marker 4 matches step 4.

4

Right part of the FL Studio Patcher map: Harmor with a yellow cable from its output to To FL Studio. A teal leader line points to Harmor's output port. Numbered marker 4 matches step 4.

4

2

In Patcher’s Map tab, right-click and add Chord Chameleon and your native FL Studio instrument.

3

Connect From FL Studio to Chord Chameleon with a green cable.

4

Connect Chord Chameleon to your native instrument (e.g. Harmor) with a green cable, then connect the instrument to To FL Studio with a yellow cable.

CHORD CHAMELEON · SETTINGS

FL Studio MIDI settings for Chord Chameleon in Patcher: Input port, and Output port set to 1 and outlined in teal. Numbered marker 6 matches step 6.

6

5

Double-click Chord Chameleon and open its settings in the top-left corner:

FL Studio plug-in settings icon: a plug with a small gear

6

Set Chord Chameleon’s MIDI Output port to 1 or any unused port.

7

Play your keyboard into the Patcher channel. Chord Chameleon will now process the incoming MIDI before it reaches your native instrument.

CHORD CHAMELEON

CHORD CHAMELEON

CHORD CHAMELEON